
How to Use DuckDuckGo With Residential Proxies
27.07.2026 12 min
Two common challenges businesses and researchers face when web scraping are geo-restrictions and IP bans, especially when the target sites have advanced ant-bot systems. Node Unblocked helps bypass such internet restrictions, providing a seamless web scraping process. This proxy tool reroutes your traffic through a remote server to make your scraping traffic anonymous.
If you’re keen to learn more about how Node Unblocker works and how to set it up, keep readWeb Scrapinging. In this comprehensive guide, we will explore how Node Unblocker works, steps for deploying it, its limitations, and more. So, without further ado, let’s dive right in!
Node Unblocker is an open-source web proxy library built as middleware for Node.js. Its primary purpose is to bypass internet restrictions and network filters by acting as proxy that processes and unblocks web content for the end user. As will be covered later in the article, it can be used alongside tools such as Playwright to enable a more seamless and restricted web scraping experience.
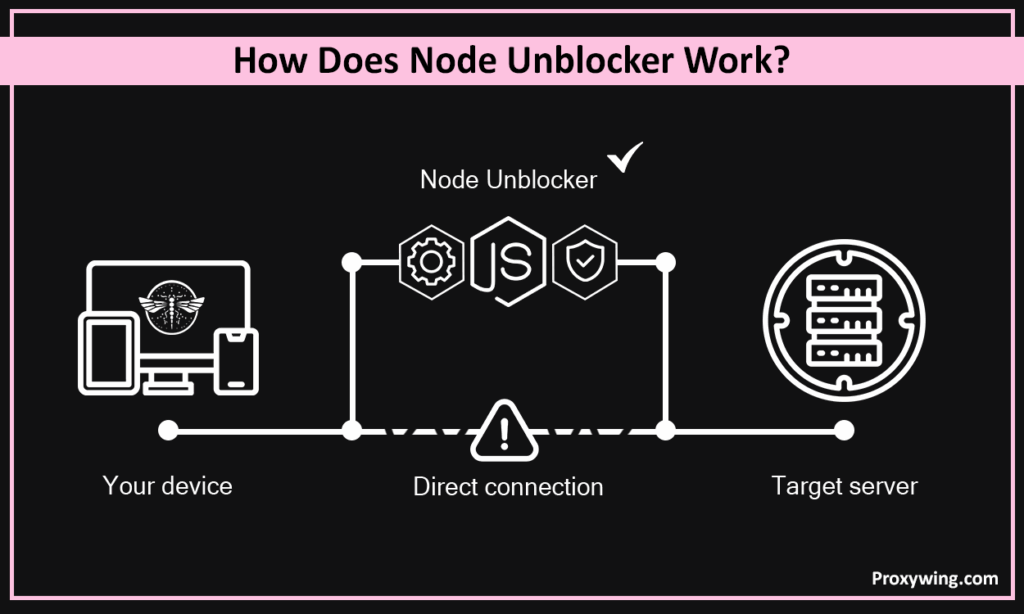
Your scraping activity is at risk if you connect directly to a target server with your device or local network IP address. Node unblocker is built to solve this issue. It is basically a proxy that works by intercepting a web scraping request, fetching data from a target website via the server, and rewriting the response.
It dynamically modifies HTML, CSS, and JS links so that all subsequent clicks and resource loads routes through the proxy’s domain rather than trying to connect directly to the blocked sites. When you leverage this proxy solution, your real IP address and location are hidden for the target servers.
Download the Node.js from nodejs.org. After the download, run the installer on your machine. Run the node -v and npm -v command using terminal (Linux and macOS) or PowerShell on Windows PCs to ensure the runtime and package manager are active.
Create a dedicated JS project folder to separate it from other files and allow npm to track the dependencies.
Use File Explorer on your machine or run the command below to create the folder:
mkdir my-proxy-server
cd my-proxy-server
Navigate to the folder you create above and run the common below:
npm init -yThe above command initializes a package.json file for managing the project metadata.
To build the unblocker, you need two specific libraries, which are the proxy engine itself and a web server framework.
Install the Node Unblocker proxy engine and the web framework:
npm install node-unblocker expressIn the above command, express is the web server’s Node.js web application framework and node-unblocker is the engine that handles the advanced logic that fetches external sites and rewrites their URLs.
Create a file named server.js:
const express = require('express');
const Unblocker = require('node-unblocker');
const app = express();

const unblocker = new Unblocker({ prefix: '/proxy/' });
app.use(unblocker);

app.listen(8080, () => console.log('Proxy running on port 8080'));
The above Javascript script initializes Express, attaches the Unblocker middleware with a specific URL prefix, and boots the server.
Run the node server.js command to start the cloak server. The confirmation message will be shown in the CLI if the command is successful.
You can visit http://localhost:8080/proxy/https://www.google.com to test if the proxy works as expected. If the page loads, your proxy is successfully rewriting traffic.
For those who may not know, Puppeteer is Node.js library that provides a high-level API for controlling headless browsers using DevTools Protocol. This automation tool can be used alongside Node Unblocker for effective web scraping. To configure Puppeteer to redirect traffic through your local node-unblocker instance use the script below:
const browser = await puppeteer.launch({
  args: ['--proxy-server=http://localhost:8080']
});It is an open-source automation library for browser testing, web scraping processes, and other similar tasks. The script below shows how to set up the proxy in the launch options with Playwright.
const browser = await chromium.launch({
  proxy: { server: 'http://localhost:8080' }
});Node Unblocker hides the scrapers IP address which helps bypass any restrictions implemented by the target servers. Developers usually integrate it directly into scraping pipelines to rotate IPs or mask the scraper’s origin without needing a third-party commercial proxy service.
Node Unblocker runs on a remote server, which ensures that your proxy remains accessible 24/7 and provides a consistent public IP address.
Render enables straightforward integration with GitHub, thanks to its developer-friendly interface. Follow the steps below to deploy it:
To get started, you must ensure your project folder contains a package.json with a defined start script: “scripts”: { “start”: “node server.js” }.
Create a .gitignore file and add node_modules/ to prevent uploading thousands of unnecessary files. Push the code to a GitHub repo.
Log in to your Render Dashboard and click New + > Web Service.
Connect your account (GitHub) and select the repository you created in step 1.
Heroku allows developers to deploy directly from the terminal. Follow these three steps for deploying Node Unblocker using Heroku:
Download Heroku for your OS and run the heroku login command after. This will open a browser window to authenticate your user account.
Go to your project folder and run the heroku create your-unique-app-name command where “your-unique-app-name” is the app name of your choice. The above command will create a new app on Heroku and add a “remote” called heroku to the local Git configuration.
Heroku requires Procfile (a file name with no extension) in your root directory. The contents of this file should be: web: node server.js.
To commit your changes, run the git add . and git commit -m “Prepare for Heroku” commands. Finally deploy using the git push heroku main command.
Before deploying a proxy for bypassing restrictions, you must review your hosting provider’s terms of service. There are hosting providers that prohibit public proxies due to their high bandwidth usage. You must also ensure your execution for bypassing network restrictions does not violate local data privacy laws.
By default, Node Unblocker routes all traffic through the single IP address of the host server. The lack of rotation makes it easy for blocked websites to detect or block a connection if their systems detect multiple requests coming from the same IP address simultaneously. Accessing blocked websites requires using node-unblocker along with residential proxies that offer more trusted IPs in large quantities. Another alternative is configuring different node-unblocker instances to use unique IPs, which is expensive.
Modern security solutions like Cloudflare use TLS fingerprinting and other advanced techniques to detect proxies. Node Unblocker often fails to mimic real web browsers, which can lead to permanent blocks or impossible CAPTCHAs. This makes it a less reliable option for handling web scraping projects or accessing content from JS applications and websites with strict anti-bot systems.
Because the tool rewrites URLs and modifies headers, it often breaks OAuth flows and session cookies, making it unreliable for handling web scraping data behind logins or navigating authenticated user paths.
Web standards change rapidly. Node Unblocker often uses complex pattern matching to find and replace URLs within a website’s source code. Keeping this “rewriting” logic functional requires constant debugging and manual updates to avoid the proxy from breaking when a target site updates its JavaScript or if they switch to a different JS library.
| Feature | Node Unblocker | Dedicated Proxy Servers |
| IP Pool | Single IP | Millions (Residential/ISP) |
| Bypass Power | Low (Easily detected) | High, especially residential and ISP proxies |
| Maintenance | High (Self-managed) | Zero (Managed) |
Node unblocker can be used alongside proxies to enable more capabilities like IP rotation. Traffic from the node-unblocker server can be routed through proxies before being sent to the destination. ProxyWing offers high-speed residential and ISP proxies that provide the anonymity and automated IP addressing that is needed to bypass any block.
Article written by:

Full Stack AI Engineer
Alexandre brings deep full-stack expertise to Proxywing's engineering efforts — from backend architecture and performance optimization to AI-driven development workflows. His hands-on work spans Node.js, React, cloud infrastructure, and RAG pipelines, giving him a rare ability to tackle both proxy platform internals and user-facing product challenges. At Proxywing, Alexandre focuses on designing resilient systems, eliminating performance bottlenecks, and integrating modern AI tooling into the development process. Outside of coding, he's passionate about exploring the frontiers of AI engineering and building side projects that push his technical boundaries.
All articles by author (56)Yes, web scraping with node-unblocker is legal as long as you comply with the target site’s terms of service and local laws.
Cloudflare uses advanced algorithms that can easily detect traffic from Node Unblocker. In its default setup, Node Unblocker does not include the sophisticated fingerprinting capabilities required to bypass such systems.
No, it uses one IP address by default. To enable IP rotation, you must integrate it with a dedicated proxy solution with a large IP pool.
Large scale projects usually require advanced IP rotation, which node-unblocker does not offer. This makes it only ideal for small scraping projects targeting less protected websites.
Yes, you can. To enable capabilities like IP rotation that are needed especially when scraping sites with advanced bot systems, using dedicated residential proxies is necessary.