


How to Bypass DataDome: Detection Layers, Working Methods, and Honest Limits
06.10.2026 17 min
Before you can access a proxy server, you need to authenticate by either using a username and password or IP whitelisting. The choice between these two largely depends on your needs and what your provider supports.
Choosing the wrong proxy authentication method will affect your experience, requiring users to carefully choose the right one before getting started. In today’s guide, we will explore these two mechanisms in detail to help you make the right choice. Let’s dive in!
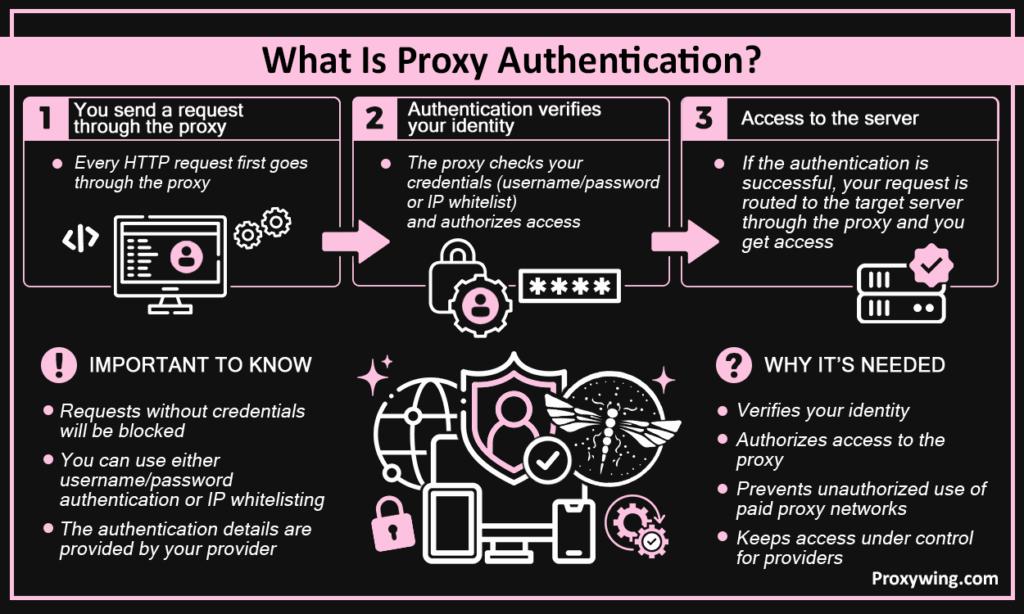
Proxy authentication is the process proxies vendors use to determine the users they give access to their servers. It is a validation layer that verifies identity and authorizes access before routing any http request through the proxy. Without it, anyone could use a paid proxy network freely, taking away access control from the providers.
Sending requests without authentication credentials will get your connections blocked. When purchasing proxies from a provider, you will be required to choose any of the two authentication mechanisms. You can connect either using the username/password authentication or IP whitelisting. The authentication information is offered by your provider.
Prevents unauthorized use, protects bandwidth, and ensures only paying customers route traffic through the network. As a user, if you pay for a dedicated IP address, providers with authentication give you the assurance that it is only you using this IP address to access the internet.
Let’s explore some of the crucial components for any proxy authentication workflow.
The authentication header is sent in a 407 response. It tells the client which authentication scheme and realm to use. Example of how this looks in response headers: Proxy-Authenticate: Basic realm=”proxy”.
Sent by the client after a 407 challenge. It contains encoded credentials, which are essentially special characters in proxy URLs that must be URL-encoded to avoid breaking the parser.
If the HTTP responses contain 407, it means authentication is required before the proxies will forward the request. Always accompanied by a Proxy-Authenticate header. If the client sends wrong or missing credentials, the 407 repeats.
As stated earlier, most commercial providers offer two mechanisms: username/password and IP whitelisting. Most providers support both and the right choice depends on your infrastructure and specific use cases of the project at hand. Let’s explore each of these mechanisms in more detail:
With this authentication mechanism, credentials are embedded in the proxies URL or sent via the Proxy-Authorization header. Best for dynamic IPs, remote teams, and rotating workflows. It allows you to access and use proxies using different IPs. All you need is to configure authentication using the username and password acquired from your provider. The passwords and user names are created at the time of purchase.
Pros
Cons
With this authentication mechanism, your public IP is mapped to your account. Requests from that IP are automatically authorized and no credentials needed per request. However, if you switch to a different network or device, your IP public automatically changes, which blocks you from accessing the proxies again.
Pros
Cons
| Use Case | Recommended Method | Why | Security Profile | Setup Complexity |
| Developer laptop | Username/Password | Dynamic IP | Medium | Low |
| Static production server | IP Whitelisting | No credentials in transit | High | Low |
| Remote team | Username/Password | Works from any location | Medium | Medium |
| Scraping scripts | Username/Password | Session IDs in usernames | Medium | Low |
| Office network (NAT) | IP Whitelisting | Single IP covers all staff | High | Very Low |
| Mobile/4G device | Username/Password | IP changes constantly | Medium | Low |
| CI/CD pipeline | IP Whitelisting | Dedicated egress IP | High | Low |
| Multi-region scraping | Username/Password | IPs vary by region | Medium | Low |
The basic authentication scheme is the default scheme that uses credentials base64-encoded and sent with every request. Not encrypted and only secure when using HTTPS requests. This authentication scheme is common in commercial proxies contexts.
This authentication scheme uses MD5-hashed credentials in a challenge-response flow. It is a very secure authentication scheme and protects against replay attacks but more complex and rarely used in commercial proxies contexts.
Windows-specific schemes for corporate environments. NTLM is a session-based authentication scheme. Negotiate auto-selects between Kerberos and NTLM. This authentication scheme is relevant for enterprise proxies inside corporate networks.
It is a token-based authentication protocol or scheme that separates authorization from credentials. Scoped access tokens replace passwords. It is increasingly common in cloud-native proxies and one of the most secure authentication schemes.
| curl -x http://proxy-host:port -U username:password https://target.com URL-encode special characters in the password if embedding credentials in the URL. |
| proxies = { “http”: “http://username:password@proxy-host:port”, “https”: “http://username:password@proxy-host:port” } response = requests.get(“https://target.com”, proxies=proxies) Use os.environ to avoid hardcoding credentials. |
| // Axios const response = await axios.get(“https://target.com”, { proxy: { host: “proxy-host”, port: 8080, auth: { username: “user”, password: “pass” } } }); // node-fetch const agent = new HttpsProxyAgent(“http://user:pass@proxy-host:port”); const response = await fetch(“https://target.com”, { agent }); |
When choosing a provider, it is crucial to look for one that supports both proxy authentication mechanisms, makes it easy to switch between them, a dashboard for credential rotation and whitelist management, and session ID support in the username field. Most of the modern providers typically fulfill these conditions, but you need to confirm before committing to avoid facing limitations down the road.
ProxyWing supports both username/password and IP whitelisting across residential, datacenter, ISP, and mobile proxies with a single management dashboard. You can choose between any of these two authentication mechanisms after purchasing. If you choose username/password authentication, remember to copy the correct credentials because you will need them during the set up.
This authentication error is usually caused by wrong, missing, or expired credentials. To resolve it, verify credentials, check subscription status, and confirm Proxy-Authorization header is being sent.
Timeout = wrong host or port. 407 error = right endpoint, wrong credentials. Make sure to check both separately. Typing in the wrong authentication is pretty common, so start by checking for any typos, especially when using the username/password authentication mechanism.
Your public IP changed. This can happen when you switch devices or change the network that you are connected to. To fix this, re-add current IP in the provider dashboard, or switch to username/password authentication.
Characters like @, :, / break URL-embedded credentials. To fix this, URL-encode the password or pass credentials via the header instead.
This issue is caused by cached bad credentials. To fix it, clear browser cache and save proxy passwords, then re-enter the credentials.
Use environment variables or a secret manager. Hardcoded credentials frequently leak into public repos, which is a securing nightmare. Use environment variables in your code as follows:
| username = os.environ.get(“PROXY_USER”) password = os.environ.get(“PROXY_PASS”) |
Rotate passwords every 60–90 days. Review whitelisted IPs quarterly and remove stale entries from former employees and decommissioned web servers.
Basic authentication credentials are trivially decoded over plain HTTP. HTTPS encrypts the auth header in transit, making the connection more secure. ProxyWing supports HTTPS across all types of proxies.
Layer IP whitelisting and username/password for sensitive or compliance-driven workloads where a single authentication factor isn’t sufficient.
Article written by:

Full Stack AI Engineer
Full-stack engineer at Proxywing working across backend architecture, performance optimization, and AI-driven workflows. Node.js, React, cloud infrastructure, and RAG pipelines.
All articles by author (61)This error is typically caused by missing, wrong, or expired credentials or the Proxy-Authorization header not being sent. To resolve it, verify credentials and confirm the header is present on each request.
Proxy-Authenticate comes from the server and it specifies the required authentication scheme. Proxy-Authorization comes from the client and it contains the actual credentials. So, the key difference is that one starts from the server-side while the other starts from the client side.
Cached bad credentials or mismatched authentication scheme. Clear saved proxy passwords and browser cache, then re-enter.
The client sends a CONNECT request with credentials. The proxy validates them and opens an encrypted tunnel. Auth happens before the tunnel — credentials are never exposed to the target server.
Usually a credential formatting issue or the app not sending the Proxy-Authorization header. Check the outbound http headers your app is generating.
Rarely. Most free proxies involve no authenticating workflow — making them overcrowded, slow, and frequently abused.
HTTP uses the Proxy-Authorization header. SOCKS5 handles authentication at the protocol level during the handshake. Most tools handle this automatically with socks5://user:pass@host:port.