


Proxy Authentication Methods Explained: Username/Password vs IP Whitelisting
06.10.2026 10 min
One of the easiest ways to set up and use a proxy to route web traffic is by installing a browser extension like FoxyProxy. By using a browser extension, you can quickly input the proxy details and get started routing your web traffic without changing any system settings. FoxyProxy is one of the most common extensions out there, and it can be installed in a wide range of browsers, including Chrome and Firefox.
In this guide, we will discuss all the main steps you need to follow to quickly install this extension in Chrome and Firefox. FoxyProxy is also supported by other Chromium browsers like Edge and Opera, so the steps for Chrome can easily be adapted for those browsers. Before we dive into these steps, let’s look at a few basics about FoxyProxy.
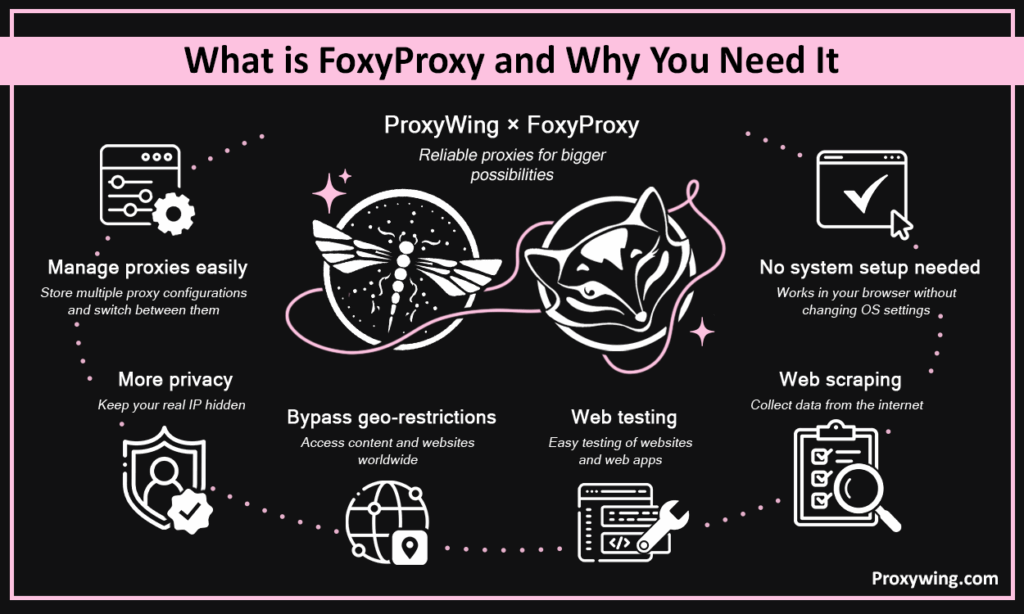
FoxyProxy is a free, open-source proxy-manager extension that has been in the market since 2006. This extension allows users to store multiple proxy configurations and to switch between them without touching browser/OS settings, making the whole experience more seamless.
Using these extensions removes the need to retype host, port, and credentials on every switch, which makes it more easy to use for even everyday users. Some of the reasons you may consider using this proxy extension include:
The built-in browser settings store one configuration and apply it globally to every connection. With FoxyProxy, you can store unlimited profiles and can switch by URL, tab, or private window with one click.
Since it is open source, it is free and requires no paid account to get started. Some browsers also don’t have built-in proxy settings, so using an extension like this is the way to go.
FoxyProxy works with a wide range of browsers, including Google Chrome, Firefox, and most Chromium-based browsers such as Edge, Opera, Vivaldi, and Brave. It supports the standard protocols, including HTTP, HTTPS, SOCKS4, and SOCKS5.
Please note that the Chrome and Firefox builds of this extension have been unified since version 8, so the steps for installing and configuring each are almost the same, as of October 2026.
Some of the features FoxyProxy providers include one-click, credential-free proxy switching with URL-based automation, per-tab/container assignment, and privacy tools like WebRTC blocking, Global Exclude, and Incognito mode support, and keyboard shortcuts.
Let’s explore the key features in detail:
After creating your proxy configurations with FoxyProxy, you can switch between them with one click from the toolbar dropdown with no restart required. A color-coded icon shows the active profile, allowing you to know the proxy your traffic is being routed through.
All the different proxy profiles you create carry URL patterns, so FoxyProxy auto-routes matching sites and sends the rest directly. For instance, you may choose to route all Amazon traffic and allow the rest of the traffic to go directly. With this feature, you no longer need to enable or disable the proxy manually.
FoxyProxy also allows you to assign different proxies to different tabs for parallel work. This is documented as a Firefox-only capability, so it isn’t available on Chrome or other Chromium-based browsers.
Export configs to a file to move devices or share with a colleague, and also works as a backup. This feature allows users to seamlessly share their settings with others or between devices without the need for cloud syncing.
FoxyProxy also allows you to add a name, color, and flag per profile, making it easier to keep large lists manageable at a glance.
Assign a proxy for private windows only to enable maximum privacy whenever you switch to Incognito mode. In Firefox, this must be enabled at install time.
Supports the use of full regex, not just * wildcards, with a built-in tester to validate rules first. This makes it even more flexible and precise than simple wildcard matching alone.
Toggle WebRTC on/off in-extension to prevent real-IP leaks behind a proxy. With this feature, you don’t need to touch about:config or install a separate add-on since the toggle applies instantly and can be scoped per proxy profile, so WebRTC stays blocked only when that specific proxy is active.
One-click presets for Tor, Privoxy, and Psiphon skip manual host/port entry entirely. This allows you to pick the preset and FoxyProxy fills in the known-good connection details. FoxyProxy also has extensive built-in help documents for every option for first-time users.
These are the key differences
| Feature | Standard | Basic |
|---|---|---|
| Basic profile management | Yes | Yes |
| One-click switching | Yes | Yes |
| URL Patterns | Yes | No |
| Pattern Tester | Yes | No |
| Whitelist / blacklist by domain | Yes | No |
| Price | Free | Free |
In 2026, both FoxyProxy versions remain free
Install only from the Chrome Web Store or Firefox Add-ons. We don’t recommend using a third-party mirror since your proxy traffic passes through it. Let’s explore the steps for installing this extension on Chrome and Mozilla Firefox:
These steps apply for other Chromium-based browsers, including Edge, Opera, and Vivaldi.
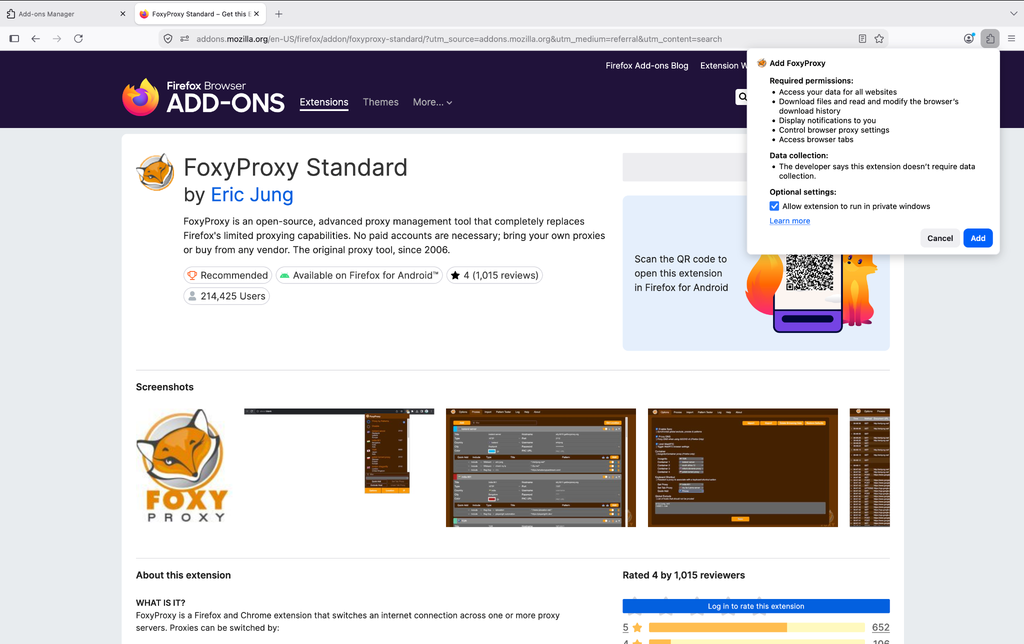
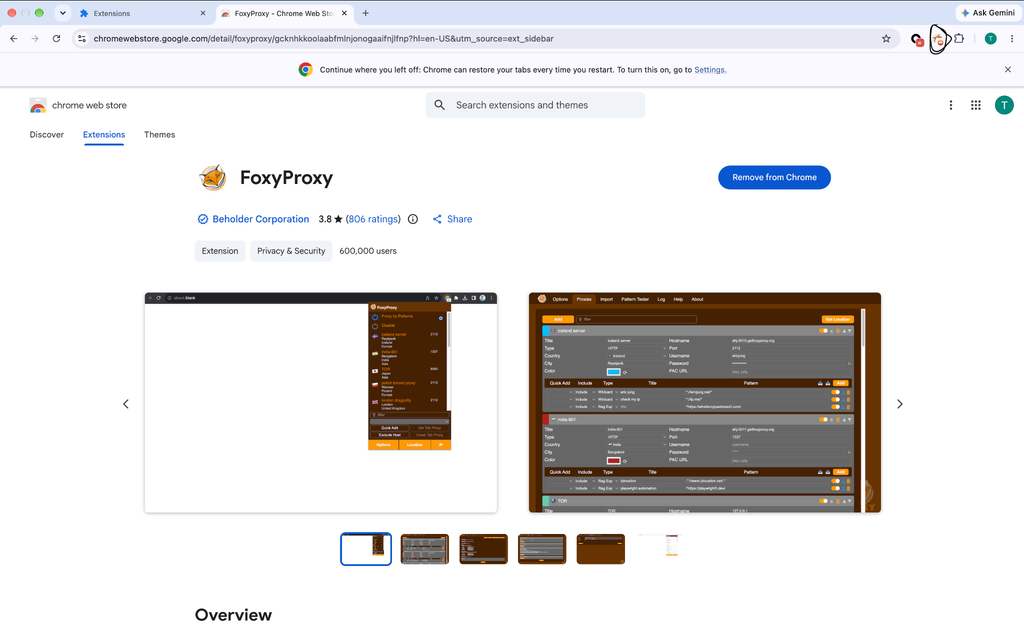
Once you have installed FoxyProxy on any of the browsers, you can now input the proxy parameters to get started routing your traffic. Create a configuration, save it, select it from the icon. The flow is identical in both browsers.
Click the FoxyProxy icon in the toolbar (or find it under the browser’s Extensions menu if it isn’t pinned), then select Options from the dropdown to open the full settings page in a new tab (shown in screenshot below)
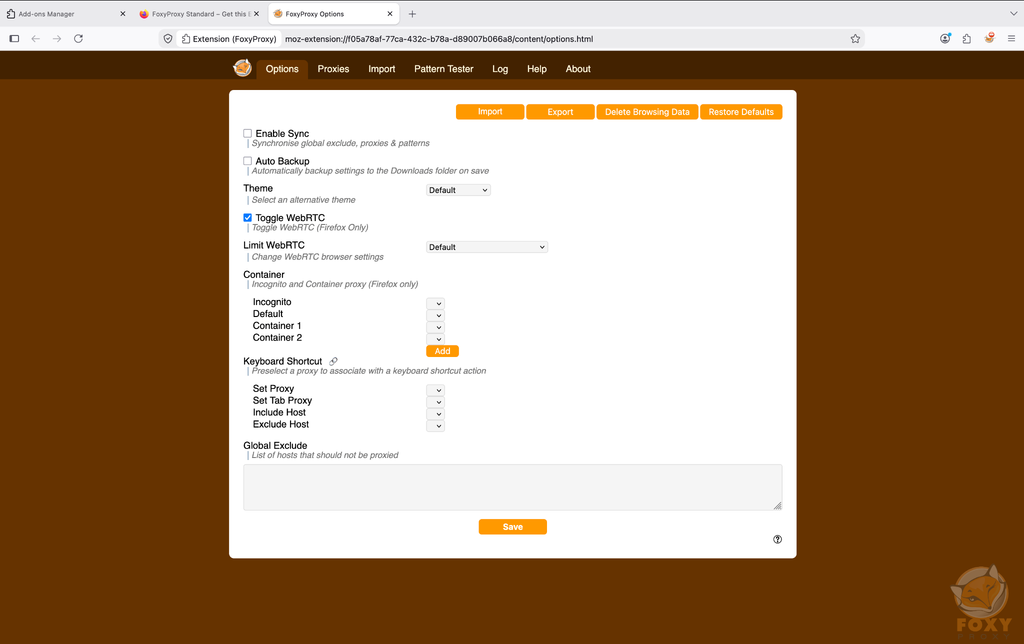
In the settings page, switch to the Proxies tab, then click Add on the left to open a blank configuration form. Fill it out with your provider’s connection details and save it as a new profile (shown below).
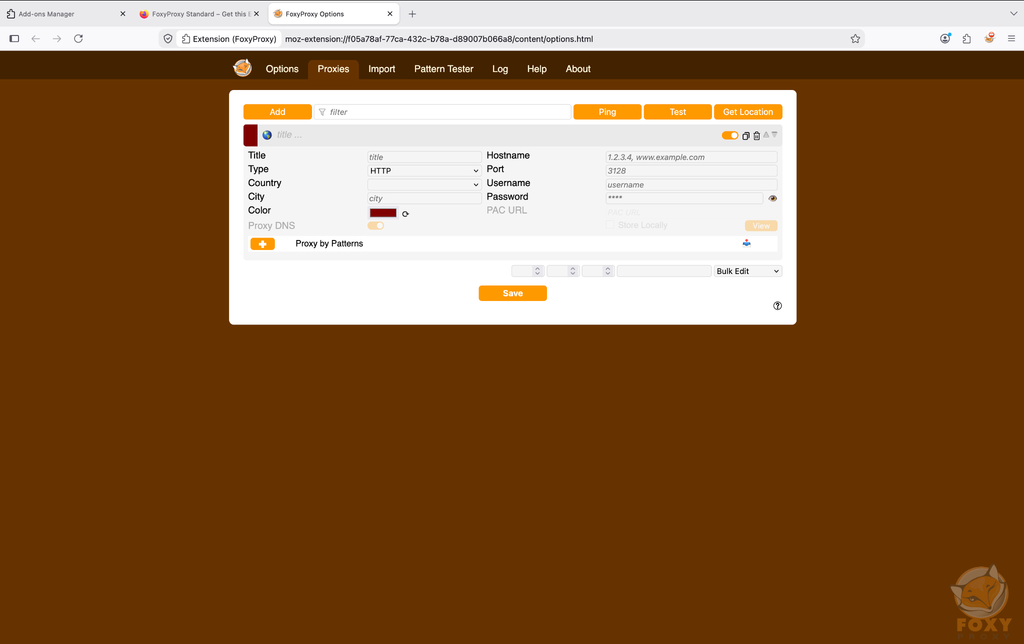
Fill in the proxy server details, including the hostname (IP address), port, and log in credentials if provided. These details come from your provider’s dashboard and a typo in any will cause a silent failure, not a visible error.
Let’s explore the various configurations in detail:
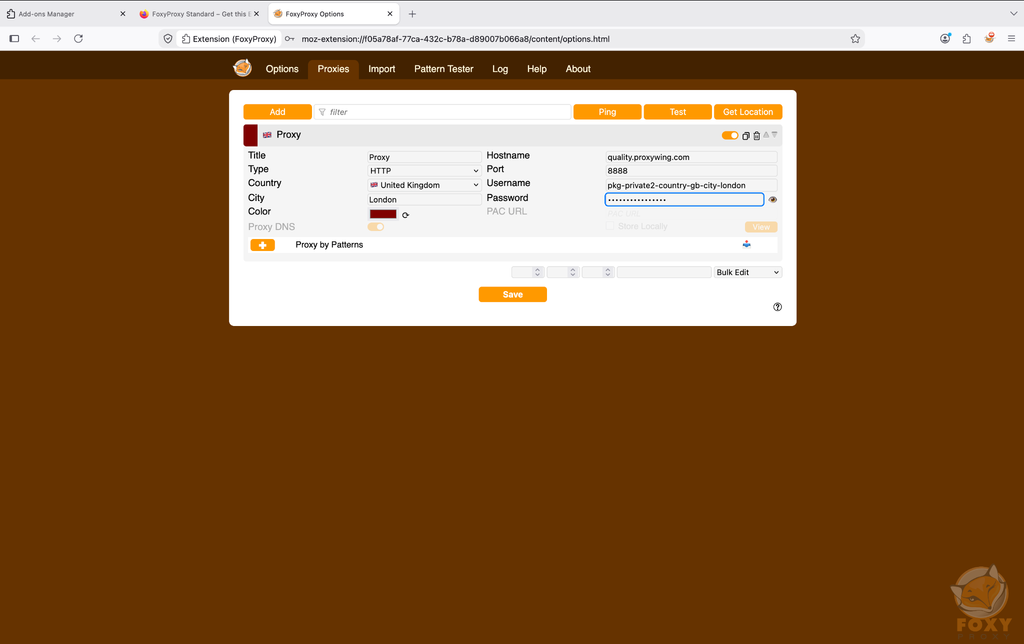
This is an arbitrary label for your own reference and you can decide a naming scheme early. It allows you to easily identify which profile you are using.
You can choose between the HTTP, HTTPS, SOCKS4, or SOCKS5 protocol depending on your use case and other preferences. These are usually set by the provider and the wrong type is a common cause of dead connections.
This can be the gateway domain for rotating proxies or specific IP for static/dedicated ones. It should be set up at the time of purchasing the proxy from your provider.
The port number is provider-set and often maps to IP position, rotation behavior, or protocol. Double check the provider’s dashboard to get this right.
If you chose the password/username option, you need to watch for required prefixes (e.g., customer-USERNAME). Leave this option blank if using IP whitelisting.
Once you have input your proxy configurations save them and select the profile from the icon. The icon color confirms it’s active, no restart needed.
Before accessing any of your target sites, check an IP-lookup service against the proxy’s expected location. Consider testing on more than one, and check for WebRTC/DNS leaks. The screenshot below shows the proxy check made using ProxyWing’s IP checker tool.
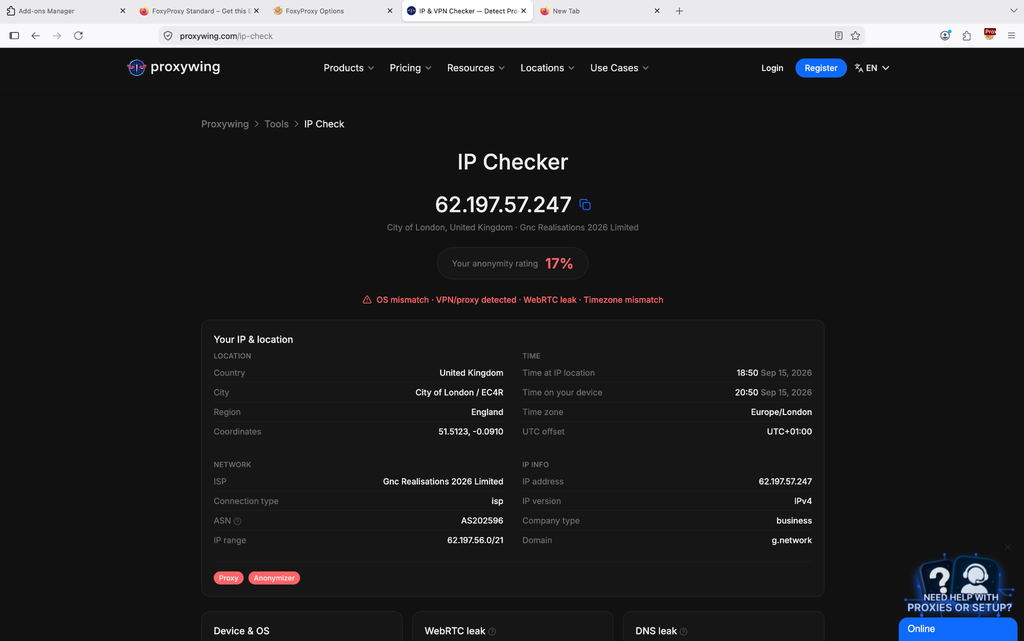
Click the extension icon and select a profile to enable it, or choose Disable to go direct. Disabling is not the same as removing; removing deletes profiles, which means you’ll need to reconfigure them from scratch.
Regardless of the proxy type, you fill out the same form, but with different parameters per type; this is where most setup mistakes happen.
Table 2. Proxy type configuration reference
| Proxy type | Hostname | Port | Username format | IP rotation | Typical use |
|---|---|---|---|---|---|
| Rotating residential | Provider gateway domain | Rotation-specific port | Includes session/location tags | Per request | Scraping, high-volume automation |
| Sticky residential | Provider gateway domain | Sticky-session port | Includes session ID | Held for session | Account management, logins |
| Static residential | Assigned IP | Fixed to that IP | Standard credentials | None | Persistent sessions |
| ISP / dedicated ISP | Assigned IP or gateway | Provider-specific | Standard credentials | None or provider-defined | Speed + trust balance |
| Shared datacenter | Provider gateway domain | Provider-specific | Standard credentials | Varies by billing | Bulk, low-cost tasks |
| Dedicated datacenter (self-service/enterprise) | Assigned IP or own gateway | Indexed to IP or protocol | Standard credentials | Fixed per IP | High-speed dedicated work |
Generate in the provider dashboard by country/city/type. Choosing the rotating option changes IP per request and sticky holds one for a session (duration varies by provider). The choice between the two depends on your use case.
This is usually pre-issued and no generation is needed. The IP itself goes in the hostname field, unlike domain-based rotating proxies.
Shared datacenter proxies use the provider’s gateway, while dedicated and enterprise proxies use a specific assigned IP address, often with separate ports per protocol.
Providers often hand over a proxy as one string in the format hostname:port:username:password. For example, residential.provider.com:8000:user123:pass456. Split each segment into its matching FoxyProxy field (Hostname, Port, Username, Password) rather than pasting the entire string into the Hostname box; one of the most common setup mistakes most people make.
The exit location and rotation behavior are usually controlled without creating new profiles, either through a country-specific gateway host or a modifier appended to the username. Rotation often works the same way: one port pins the session to a single IP and another triggers a new IP per request.
If you’re testing web applications with a local tool like Caido or Burp Suite, create a profile pointing to it: Type – HTTP, Hostname – 127.0.0.1, Port – whatever your tool uses, and leave the credentials blank.
This lets you turn traffic interception on or off with a single click, instead of routing your entire browser through the local proxy all the time. FoxyProxy also includes ready-made presets for Tor, Privoxy, and Psiphon.
Instead of manually turning your proxy on and off for each site, you set the rule once; which addresses should use a proxy and which shouldn’t, and FoxyProxy handles the switching automatically from then on.
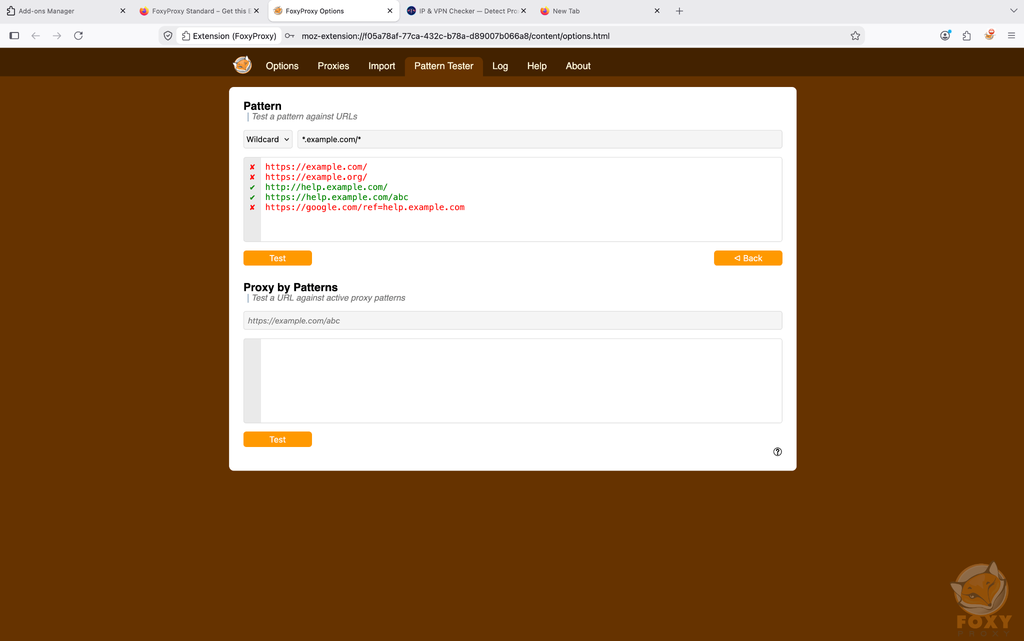
Open your profile settings and go to the Pattern Tester tab, where you can set a URL pattern and test it to confirm it works correctly before the rule goes live. The screenshot above shows the testing of the wildcard pattern *.example.com/* against five URLs in the Pattern Tester — green checks show matches, red crosses show misses.
A whitelist lists addresses that must go through the proxy, while a blacklist lists ones that should skip it. Both support simple `*` wildcards or full regular expressions for more precise matching.
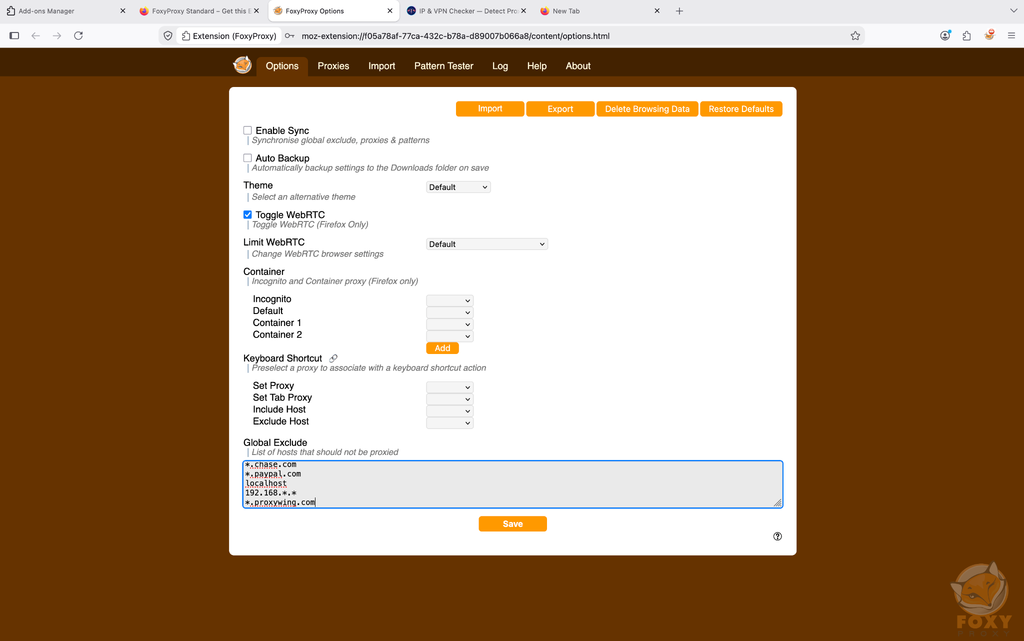
Global Exclude is a shared list of sites ( like banking sites or internal company tools) that always bypass proxying, no matter which profile is currently active. The screenshot above shows the Global Exclude list on the Options page.
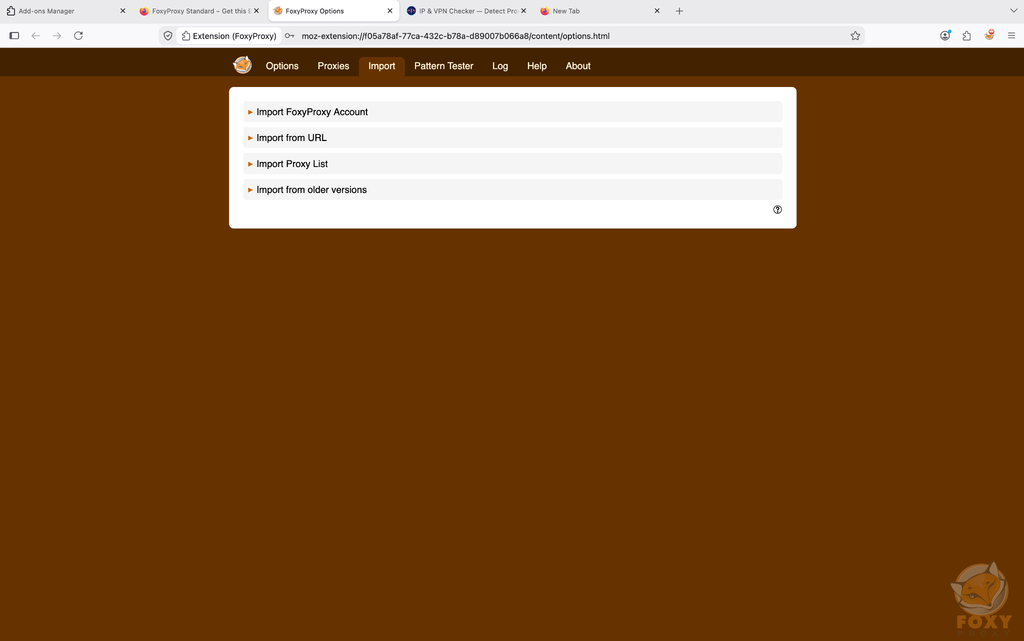
If you’re working with a lot of proxies, you don’t have to add them one at a time. FoxyProxy lets you import a whole list at once (from a FoxyProxy account, a URL, a pasted list, or a saved file) from an older version of the extension. The screenshot above shows the Import tab’s four bulk options.
Most issues trace back to proxy parameters or target-site behavior, not the extension.
Table 3. Quick diagnostics
| Symptom | Likely cause | Check first |
|---|---|---|
| Proxy doesn’t work after setup | Wrong credentials or field values | Username/password, prefixes, hostname, port, protocol type |
| Pages load incorrectly | Stale cache/cookies from old IP | Clear cache, test in private window |
| Wrong IP geolocation | Geolocation database lag/disagreement | Cross-check on multiple IP-lookup services |
| Slow connection speed | Distance to exit node or pool congestion | Closer proxy location, dedicated vs. shared |
| Constant CAPTCHAs | Overused shared/free IP | Switch to residential or ISP, reduce request rate |
| Works on some sites, not others | Site-level fingerprinting/ASN detection | Residential over datacenter, add to Global Exclude if unneeded |
FoxyProxy won’t show an error for bad credentials; it just fails silently. Check for missing prefixes, incorrect field values, stray spaces, and whether you still have remaining balance on your plan.
This is usually caused by stale cache or cookies. Try clearing them, or test the site in a private window instead.
Geolocation databases can lag or disagree with each other. Cross-check your IP on a few different lookup tools before assuming something’s wrong.
Slow speeds are usually caused by distance to the proxy server or pool congestion. Try switching to a closer location or a dedicated proxy.
Overused shared or free IPs tend to trigger anti-fraud systems. Switching to private residential or ISP proxies usually solves this.
Some sites detect more than just your IP. If a site keeps blocking you, try switching from datacenter to residential proxies, or add that site to Global Exclude.
FoxyProxy is a connection manager, not a security tool. So, it doesn’t encrypt your traffic or guarantee anonymity, since fingerprinting, WebRTC, and DNS leaks can still expose you. It only proxies browser traffic (not the rest of your system), has limited mobile support, and as a third-party tool, comes with no vendor responsibility if something goes wrong.
Article written by:

Full Stack AI Engineer
Full-stack engineer at Proxywing working across backend architecture, performance optimization, and AI-driven workflows. Node.js, React, cloud infrastructure, and RAG pipelines.
All articles by author (61)Yes. FoxyProxy has been around since 2006 with no reported security incidents, and its development team is public. However, how safe your setup actually is still depends on the proxy provider you choose to use with it.
FoxyProxy itself is free and open-source as of October 2026; you only pay for the proxies you connect through it. FoxyProxy also offers its own paid VPN service, but that’s entirely separate and optional.
Not as a proxy manager. The mobile apps are part of FoxyProxy’s paid VPN service, not a tool for connecting to third-party proxies.
You have three options: disable proxying (your saved profiles stay), disable the extension itself (profiles also stay), or remove it entirely (profiles are deleted). If you’re removing it, export your settings first so you don’t lose them.
No, settings aren’t carried over automatically. You’ll need to export your configuration to a file and re-import it, or restore it through account sync.